Saturday, April 20, 2013

Ginger Brulee


I read the Guardian. I know that might change your opinion of me, but it’s true. For a while now they’ve been publishing a piece called “How to cook the perfect….” and it always catches my eye. The premise is simple. They choose an iconic dish, fried chicken for example. Then they research recipes by iconic chefs and cooks. The author then cooks all of these, critiques them and essentially comes up with her own.

I recently read her piece of crème-brulees. I love crème-brulees! If I see one of a menu, I’d be hard-pressed not to order it. Having said that, I haven’t had the best luck making them. I’ve found that my custard is either overcooked or undercooked, so after investing all that time and all those egg yolks into the recipe, it never worked. I mean, a few worked. But I could never get consistency. I even invested in a blow torch to get the full impact and that all-desirable sugar crunch.

So, I put aside my demons, after reading this recipe and decided to give it a go. Guess what? It worked, it worked amazingly well, even when I put them under the grill as I was sans blow torch.

The second time I made these, I couldn’t help but put my own spin on it. I wanted my crème-brulees to taste like my favourite ginger brulee tarts from the Bourke St Bakery. This is the kind of place dreams are made of. One of my favourite go-to foodie spots in Sydney. The best thing on their menu (in my opnion) is there ginger brulee tart. 

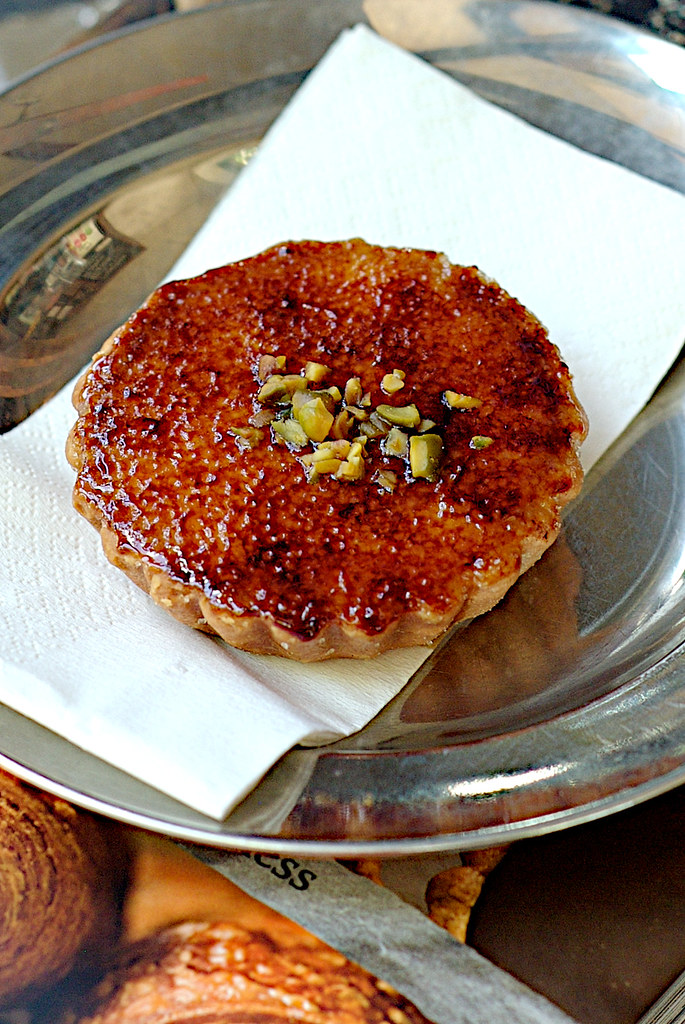
The famous ginger brulee tart from Bourke St Bakery


A crispy pate sucre filled with a lightly spiced ginger/chai custard and bruleed on top. It’s truly a taste sensation and something I hope to make in it’s entirety one day. 

Until then here’s my


Ginger Brulee


Ingredients


  • 600ml double cream
  • 6 egg yolks
  • 50g caster sugar
  • 2 cardoman pods bruised
  • ½ a cinnamon stick
  • 2.5 cm of ginger
  • ½ a tsp vanilla extract
  • 6 tablespoons of caster sugar for the brulee


Instructions

Preheat the oven to 150C and put 6 small ovenproof ramekins ( I used 4oz) in a baking tin.


Pour the cream into a small, heavy-based pan and add the spices. Bring to the boil over a medium-low heat.


Take the cream off the heat and leave to infuse for at least 4 hours

Re-heat the cream over the medium-low heat and bring back to the boil In the mean-time mix the egg yolks and sugar in a heat-heatproof bowl and stir until just combined. 

When the cream begins to boil pour the cream on to the yolk and sugar mix, stirring constantly to mix.

Divide the mixture between the ramekins through a strainer (remember all those lovely spices you don’t want in your crème brulees. Pour cold water into the baking tin until it comes two-thirds of the way up the ramekins.

Bake for about 40 minutes until the custard is set – it should only wobble faintly when shaken. Cool and then chill until cold.


Scatter the tops of the cold brulees with the remaining sugar, and use a blowtorch or hot grill to caramelise the tops. 


Now the best trick I’ve learnt when blowtorching the brulees is to do it in layers. I’ve allocated 1 tablespoon per ramekin, so scatter half this quantity and brulee with the blowtorch. Cool slighty then scatter with more sugar and brulee again. I find this creates a nice thick crispy bruleed top and stops the burning.


On no...I don't have a blowtorch 
Many of us don’t have blow-torches so here’s how to do it minus the blowtorch.
Sprinkle the whole quantity of sugar on the brulees and place under a very hot grill for a couple of minutes (watch like a hawk) – if using a grill, you may need to put them back in the fridge for half an hour before serving to cool down again


Monday, April 8, 2013

Raspberry and Passionfruit Marshmallows


I've been experimenting with marshmallows lately. It's something we've been making for years in my family according to the classic Doreen Peiris recipe. A simple treat to make and one that made store bought marshmallows pale in comparison.

With our influx of visitors we also have a special treat that is very hard to find in Seattle....tinned pasisonfruit! We have tons of the stuff! It amazing what a difference a bit of passionfruit can make when spooned over a tart or a pav....it tastes of home!

The original recipe goes something like this


  • 375 g of white sugar
  • 30 g of gelatin
  • 1 cup of water
  • 1 cup of pure icing sugar for dusting
  • spray oil
  • 1 tsp vanilla extract
Having made this for years I decided to change things up a bit and see if we could flavour these marshmallows. 

So here's my new and improved recipe.

Ingredients

  • 375 g of white sugar
  • 20 g of gelatin
  • 1/2 cup of water
  • 1/2 cup of fruit puree (I used raspberry and passionfruit)
  • 1 cup of pure icing sugar for dusting
  • spray oil

Instructions

Mix together the 1/2 cup of water and puree so you have 1 cup of liquid. Pour the 375g of sugar and 1/2 of the puree/water mix into a saucepan. Place on a low heat and wait for the sugar to dissolve. 

Mix together the rest of the liquid and the gelatin and leave to sit for a few minutes.

Once all the sugar has dissolved add the gelatin to hot sugar syrup.

Mix it all together and bring the gelatin/sugar mixture to the boil. Let it boil for about 30seconds and then turn the heat off.

At this point I pour it straight into my kitchen aid and put it on low. If you'd prefer, leave it to cool for a bout 10-15 minutes.

Now let the mixer run. The mixture will go from a syrup to a frothy meringue, like for a Pav. When you lift the mixer up the now opaque mixture should make a ribbon that will dissolve back into the mixture after a few minutes.


When the mixture is ready pour it into a greased, sugared tray.

Leave the mixture to set (room temperature is fine unless it's a particularly hot Sydney summer) for at least 6 hours.

Once the mixture has set you should be able to pull the mixture out and cut it into whatever shape you like. I like to place the icing sugar in a tupperware container and drop the cut marshmallows in there. Once I have a few I give it a good shake. Repeat this until all the marshmallows are coated in icing sugar.

This is a stock image, I promise to take a real picture when I make these next!


Now enjoy!

xoxox


Black Tea and Ginger Friands


A long time ago, in a land far far away (Sri Lanka), my great grandfather set up a tea factory in the hills of Ratnapura. It still stands there today and is run by my great-uncle. It makes stellar tea and if you're in the market for some Single Origin estate Ceylon Tea, there's no finer than:

New Vithanakande Estate

Since I love drinking tea, I figured I must enjoy cooking with it right? Hence this recipe. This is an ode to the Sri Lanan tradition of drinking very sweet black tea with ginger.


Ingredients


Melted butter, to grease
Plain flour, to dust
195g (1 1/2 cups) pure icing sugar, sifted
75g (1/2 cup) plain flour, sifted
155g (1 1/2 cups) almond meal
3 eggs, lightly whisked
190g unsalted butter, melted, cooled
4-5 teaspoons of good loose leaf black tea
2 teaspoons of powdered ginger
Icing sugar, to dust


Instructions

Preheat oven to 180°C. Brush thirty 40ml-capacity mini muffin pans with melted butter to grease. Dust with plain flour.

In a small pan combine butter and tea and place on a low heat. 


When the butter is melted remove from the heat and leave to stand for 10 minutes. When the butter has taken on some of the colour of the tea, pour through a fine sieve and leave butter to cool.

Combine the sugar, flour, powdered ginger and almond meal in a bowl. Make a well in the centre.

Add egg and infused butter. Stir until well combined.

Divide among the prepared pans. Divide the raspberries among the centres. Sprinkle with the flaked almonds.

Bake for 15-20 minutes or until light golden. Set aside in the pans for 5 minutes to cool slightly before transferring to wire racks to cool completely.

Dust the friands with icing sugar to serve.


Serve with a cup of Ceylon tea. 

Unduwel - Panni Walalu

Growing up, we had a friend called Sachi. She would visit us in the holidays and pester us to entertain her...apparently it was our duty. She would arrive very early in the morning and wake us up, she would then ask us to make her holdiays fun...we were none too impressed. This story has a happy ending, she grew out of most of her annoyingness and became a very dear friend. She always requested my mum make these "swirly" things, as she called them. What they really were were Panni Walalu or as we called them Unduwel.

These are delicious crispy fried swirls of dough dunked in hot kithul treacle. Yumm. My mum is famous for making these and makes them for special family events and for Sinhalese New Year.
The original recipe came from a family friend and in typical mum fashion she's made it her own.
I'm going to go against my better instincts and not write this as a procedure text type. Just to live on the edge...you know how I roll.


First we soaked a cup of urid dhal, the white version with the black skin removed. We left it to soak over night.

In the morning placed the drained dhal into a blender and added just enough water to make it into a smooth paste. We made sure to add the water a little at a time, the object being to make the mixture as thick as possible.


When it was blended we added 1 cup of fine rice flour. We mixed the two together and left it to rise in a warm spot for approximately 6 hours.


After six hours we headed a frying pan with about 2 inches of oil. In a seperate pan we warmed up about 100 grams of dark palm sugar, half a cup or kithul treacle and a bit of sugar. Once the sugars have melted turn the heat off. For the purposes of absorption this mixture must be hot but never boiling. We tend to turn the stove on for a couple of minutes every 10 minutes of so as we are making these treats.


We spooned the dhal mixture into a square piece of cloth with a small hole sewn in. This is used to squeeze loops into the hot oil.

Which is what you do next. You squeeze loops of the dough into the hot oil. When it is brown and crispy you pick it up and dump it into the hot treacle mixture.


You can see the hot treacle seeping in. Once it has been sitting there for a couple of minutes move it out of the treacle and onto a plate.
Keeps for a few days but best eaten hot, fresh and crispy.

Dhal Wade

My parents are originally from the Sri Lankan mountain city of Kandy. We still have many relatives there and spend time on our family holidays there. Our main pot of call is Helpitiya, where my mother's Aunty lives. There's is a huge house, full of secret rooms and nestled in cool tropical forest.

They  are planters, like much of my family, and they have men and women who supervise the workers. These workers are often Tamil and possess amazing additional skills, one of them being cooking. One particular man made the most amazing wades. Crispy fried and spiced lentil patties.

He would come by the house in the afternoon with a silver tray of ground lentils, ground on a traditional mirisgala, no food processor in site.

If you're curious as to how this would work, take a look here.

He would then set up a small wood fire out the back and fry these goodies up on demand. The skill required for this always amazed me. He was always able to control the temperature precisely so that the wade were crispy on the outside and cooked on the inside, never burnt, never underdone. Since it always takes me a few goes on the gas stove to master this, I'm always amazed.

Ingredients

  • 2 cups yellow split peas / red lentils
  • 1 onion minced
  • Egg
  • Turmeric
  • Salt
  • Curry powder
  • Flour as needed
  •  Maldive fish (optional)

Instructions

Soak the peas/lentils overnight


The next morning drain the water water and blend ½ the peas in a blender until broken up but not smooth (you want pieces for texture). 


     Mix the blended and unblended half together. Add the egg , spices and onion (I mince the onions in a food processor) 
Mix the dhal mixture and add flour (if needed) to make a firm paste that can be moulded into round patties. That is to say, add flour is the mixture will not hold together or is too liquidy. Sometimes you need it, sometimes you don't. 

Make the mixture into round patties about 2.5cm in diameter and about 1cm thick. I make these first and put them on a plate. If you're busy, you can do up to this step and refrigerate, ready to fry later.


Heat some oil in a shallow fry pan. When hot place 2-3 of the wade in and fry until golden
Deep fry in hot oil till golden brown and cooked on the outside.

Masala Chai Mix


I love tea! I love drinking it, eating with it and even just smelling it. It's my happy place. The smell of tea reminds me of Sri Lanka.

I was wracking the old brain to try and think of something to give the lovely ladies at my second baby shower. Pabs, I guess this means I owe you a present or two ;).
While at the appropriately named Whole pay-packet (otherwise known as Whole foods) I saw some re-usable tea-bags. Something I'd never seen before. It occurred to me then that maybe I should give the lovely ladies some tea. Something that reminded them of me.

I scoured a number of places for recipes and in the end, tweaked a few to  make my own. I then made my own and finally asked my dear husband to try it as black tea is on my list of no-nos.

Ingredients

  • 125g of good quality loose leaf black tea (we used Dilmah - a ceylon orange pekoe)
  • 3 tablespoons cloves
  • 4 sticks of cinnamon
  • 3 tablespoons of cardamon pods crushed
  • 1 teaspoon of peppercorns
  • 1 teaspoon of nutmeg (ground)
  • 150 g of crystallised ginger


Instructions

Preheat oven to 140 celsius or 120 fan forced.

Crush the cinnamon sticks and cardoman pods in a mortar and pestle.


Place cinnamon, cardoman, cloves and pepper in a baking tray roast in a the oven  for 5 minutes until
fragrant. Trust me you'll know when the time is right, the whole house will smell like masala chai.


Place the black tea in a small bowl, along with the crystalised ginger (chop into small pieces if they are big like mine) and nutmeg.


Let the spices cool briefly and mix with the tea. Make sure there is an even distribution.


I bottled these for friends and added the following 'brewing instructions for one' from thekitchn.


Brewing Instructions
tea for one


1 cup of water
1/2 cup of milk
1 tablespoon of Chai Mix placed into a tea bag
Sugar or honey to taste

Bring the water to a boil and add the teabag. Turn off the heat and let steep for about 5 minutes. Add the milk, turn on the flame and reheat until hot. Remove from heat, discard teabag, sweeten to taste, enjoy!


I should add that the best way to store tea is away from light and, while pretty, if you plan on keeping the chai for a long time I'd invest in some dark or opaque tins to keep the light out and the tea fresh.

Dukkah

I first discovered Dukkah in the Hunter Valley of NSW. A fair few of the wineries carry gourmet olive oils and most of the oils are served with crusty bread and dukkah to dip in. There are too many variations to count, but here's one of my favourites.

We haven't been able to find this middle-eastern spice mix anywhere in Seattle, in fact we've barely seen a middle eastern restaurant!

I did a bit of research and settled on this recipe because it had all the bits and pieces I liked.


Ingredients

  • 1 cup of almonds (roasted in the oven 5-7 minutes at about 180c)
  • 2 tablespoons of sesame seeds
  • 2 tablespoons of paprika
  • 1 teaspoon dried thyme
  • I table spoon each of coriander and cumin dry roasted in a pan
  • Salt and chilli to taste

Instructions


Once gathered and roasted, I tipped the spies into my food processer and let it do it's magic. Once the spices are ground (use a mortar and pestle or a spice grinder if you want it really finely ground) add the almonds and pulse. I've found if you add the almonds too soon and keep processing you'll get dukkah flavoured almond butter....tasty but not quite what we're after. The almonds also left some bigger parts but again, I'm all for the texture.


Serve with warm crusty bread and olive oil....delish!

This is also my favourite way to serve lamb, I cover the joint in oil, stud it with garlic and cover liberally with dukkah. It smells amazing as it  roasts in the oven.

Coffee cake with caramel meringue buttercream and caramel chips


This is a recipe I've adapted. Credit for the original cake recipe goes to the lovely ladies at Exclusively Food and the icing is based on a Martha Stewart one.


Coffee buttercake

Ingredients

  • 225g (1 1/2 cups) self-raising flour
  • 75g (1/2 cup) plain flour
  • 150g butter, chopped and softened (if using unsalted butter, add 1/4 teaspoon fine table salt with the butter)
  • 226g (1 cup) caster sugar (superfine sugar)
  • 1 1/2 teaspoons (7.5ml) vanilla extract
  • 3 large eggs (we use eggs with a minimum weight of 59g)
  • 83g (1/3 cup) sour cream (about 35 percent fat)
  • 83ml (1/3 cup) milk
  • 83 ml (1/3 cup) hot water
  • 2 teaspoons of instant coffee

Instructions

Preheat oven to 150 degrees Celsius (140 degrees Celsius fan-forced). Grease the side and base of a 20cm diameter (top inside measurement) round cake pan.

Combine self-raising flour and plain flour in a medium bowl and set aside. Combine the hot water and coffee until it is dissolved. Then add the milk.

Using an electric mixer or electric hand-held beaters on low speed, beat the butter, sugar and vanilla together in a large bowl.

Increase speed to medium once the sugar is incorporated. Stop the machine once or twice during beating to scrape down the side and base of the bowl with a spatula. Beat the mixture until it is pale and creamy (about five minutes).

Add eggs one at a time, beating about a minute between each addtion.

Don't rush the addition of the eggs as the mixture will be more likely to separate and develop a curdled

Add the sour cream and beat until just combined (about 10 seconds).

Make sure you're scraping down the sides of the bowl from time to time.

Sift half the combined flours over the butter mixture. Add half the milk mixture and, with the machine on very low speed, beat for about 10 seconds until just incorporated. Scrape down the side of the bowl.

Add the remaining milk and sift in the remaining flour and beat, on very low speed, for 5-10 seconds to combine the ingredients. Stop beating as soon as the ingredients are combined as over-beating the mixture may cause the cake to be tough.

Spoon mixture into the prepared pan and smooth the surface with a spatula or the back of a spoon.

Bake for about 1 hour and 7 minutes to 1 hour and 17 minutes, or until a thin-bladed knife or wooden skewer inserted into the centre of the cake comes out clean. The cake should be golden brown and spring back when lightly pressed in the centre.

Place pan on a wire rack. When cake has completely cooled, remove from pan.


Caramel Meringue Butter cream

Ingredients

  • 3 large egg whites
  • 1  cup packed dark-brown sugar
  • 1/4 teaspoon salt
  • 2 sticks (1 cups) unsalted butter, room temperature

Instructions

Put egg whites, sugar, and salt into a heatproof bowl set over a pan of simmering water. Whisk until mixture registers 160 degrees, about 4 minutes.

Beat on high speed until stiff, glossy peaks form, about 6 minutes. Reduce speed to medium-low. Add butter, 2 tablespoons at a time, beating after each addition (meringue will deflate slightly as butter is added). Don't be freaked out by the curdled appearance, it will get better.

Beat until frosting is smooth and glossy, 3 to 5 minutes.

I like to serve this with some caramel bits on top. Just put 3-4 table spoons of brown sugar into a small saucepan and when it's all melted I pour it onto some baking paper and leave to harden. When it's hardened the caramel can be broken up into shards and placed on the cake for some tasty treats.

Rosemary Scones


I've discovered during my forays into GF cooking that different GF flours work best for different recipes. Nat and I discovered for example that Redmill flour is great for cakes and strong flavoured desserts, King Arthur for pastry and this particular mix seems fabulous for scones. It's called Hodgson Mill and available at Walmart. 
Not a great picture but you get the drift right?


Not a great picture but you get the drift right?


Ingredients

  • 2 cups Gluten free flour      
  • 1 tsp. baking powder
  • 1 tsp. salt
  • 2 tsp. Xantham Gum
  • 1 tsp. baking soda
  • 1 tbsp rosemary (chopped)
  • 80g butter, very cold
  • 1 cup milk
  • 1 tsp.  vinegar
  • 1 lg. egg, beaten


Instructions


Preheat oven to 180ºC and get  a standard 12 muffin pan, greased

In a large mixing bowl, place flour, baking powder, salt, xanthan gum and baking soda; blend well.  Using a small holed grater, grate the very cold butter into flour mixture. Blend together flours and butter using two forks until the mixture resembles coarse bread crumbs. Add rosemary and blend.

In a large measuring cup, mix milk, vinegar and beaten egg together.  Pour milk mixture into the center of the dry ingredients and mix with a large spoon.  Be careful not to overmix! Batter will be moist and very thick.  Evenly spoon batter into the prepared pan and using your fingers dipped in milk, lightly flatten the tops of the biscuits.

Bake scones for 22-25 minutes or until lightly golden brown.  Remove biscuits from pan and serve warm or cool on a wire rack.

This recipe makes about 8-12 scones.

I flirted with the idea of adding parmesan but being my first try I didn't want to mess too much with the mix, especially as it was GF. I think I will dare next time.


Dukkah Crusted Chicken


With so many gluten free friends I've had to think outside the box for some recipes. Here's one that is as easy to make as it is delicious.

  • 3 chicken breasts/thighs sliced into batons
  • 15 skewers
  • 1 egg and a dash of milk
  • 1 cup of rice bubbles (make sure these are gluten free if you're going for a gluten free recipe)
  • 3 table spoons of dukkah
  • salt and chill to taste


Place the rice bubbles and dukkah into the bowl of a food processer and whizz up until most of the kernels are broken up. I added some salt and chilli at this point because I felt it lacked a bit of seasoning


Now the other day I ran out of rice bubbles so I used these instead, because they were on hand


Make up the egg wash by mixing the egg with a dash of milk


Thread the chicken onto the skewers

Dip the skewer into the egg wash and then the seasoned rice mixture

Place on a tray while you finish the rest of chicken in the same way

Freshly crumbed chicken....mmmm


These can be placed on a tray and baked in the oven for about 30 minutes


Otherwise lightly grease a fry-pan and cook the chicken skewers on a medium heat until cooked through

These are delicious on their own or with a mild tomato chutney.